 |
|||||
|
views:
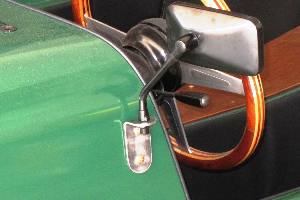
August 23, 2013 The major work on our Locost is done. The car has a body, a frame, and a running engine. You could drive it if you had a driveshaft. All that's left to do now is get it registered. In a few short weeks we'll be taking the car to the CHP office in Vallejo for the first of several inspections, but before we do that we need to add a couple of things to make the car appear roadworthy, at least to the outside observer. One of those things is the side mirrors. We were digging through old build logs at LocostUSA.com the other day, and we came across a cool design for mounting the mirrors, a design that gives us some hope that the mirrors won't completely blur the scenery above 10 mph, something that was just about guaranteed with our original mirror mount design. Our new design incorporates thick steel brackets that attach solidly to the scuttle with multiple bolts, and the mirrors then bolt to the brackets. It's actually pretty simple, although apparently not simple enough for us to have figured out on our own.
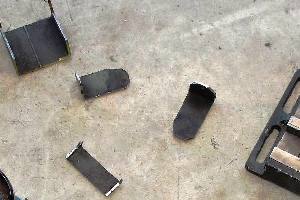
We cut our mirror mount brackets out of the last bits of leftover 3-1/2" square 1/8" wall tubing, the same material we used to make our pedal box support, and more recently our headlight platforms. After grinding and filing the brackets smooth, we drilled a few holes and bolted them to the scuttle using 1/4" AN hardware, which is no doubt overkill from a strength perspective, but AN bolts look better than cheap zinc-plated bolts, and looks of course are the first priority for the mirrors, and for just about everything else on the car. We weren't sure exactly where best to mount the brackets on the scuttle, so we drew a few pictures and decided they would look okay if the bottom of the mirror was even with the top of the scuttle. Not that we could mount them that accurately, but we got close. We also mounted them as far back as possible, but they're still farther away than your standard door-mounted mirrors, so you can't see everything behind you, although you can see a few things, like for instance the rear fenders.
Two things we like about this design. The mirrors are fully adjustable for any angle, and they flip closed like modern spring-back mirrors if they get brushed by pedestrians or other clueless objects. Although they don't actually spring back. The only downside to the mounts: we have to paint them. After two years of painting parts for our Locost, almost a hundred parts altogether, we've finally determined that we're never going to be any good at painting. We now only apply paint as a rust-preventative, and we post pictures selectively. One irritating thing about the mirrors. Whoever designed them got it in their head that the mirrors would somehow loosen up if the rods were threaded in the right-hand direction. So to clamp the mirrors to our mounts, or anything else, you need two left-hand threaded nuts. Only one is supplied with each mirror, and the threads are 10mm x 1.25mm, which of course nobody has. So we were able to mount one mirror by stealing the nut from the other mirror, but this obviously isn't a long term solution.
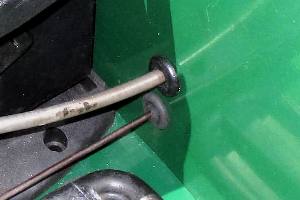
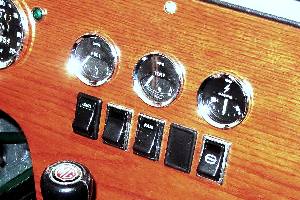
Besides the mirrors we took care of a couple of other things this week. We got the turn signals working, finally, after identifying a missing connection under the dash, and we added a couple of grommets to the firewall for the speedometer cable and oil gauge line. So we're mostly safe now from deadly fumes seeping into the cockpit area from the engine bay, although the same deadly fumes are still free to pour into the cockpit over the scuttle from the giant holes in the hood. Although that should be less of an issue once we have a windshield. We also filled in the last hole in the dash with a shiny Smiths ammeter gauge, $20 off eBay. We didn't actually wire up the ammeter and we don't plan to, because ammeter wires are known to spontaneously combust from time to time, even when semi-professionally installed. The important thing is, the gauge looks good and it matches all of the other gauges, and the needle sits right around zero which would seem to indicate that the alternator is keeping up with the load on the electrical system, and therefore nothing is broken.
There's something about the dashboard that's been bothering us for a while now. It's not a huge deal, but I think we might've put the switches a little too close together. The problem isn't with the ergonomics. It's the asthetics. The switches look all squished together, especially compared to the gauges above. They should've been spaced out so they were at least as wide as the gauges. Nothing we can do about it now of course. We'll live with it. But it might be something for future M.G. Locost builders to consider. We're patiently waiting for our windshield kit to arrive, and also our front fenders, although we're expecting the windshield first because we haven't ordered the fenders yet. These are the last two big jobs on this project, if you don't count the seats, which we don't. We could start making the front fender stays now, since we have all the metal we need, but it's going to involve cutting and grinding and welding, and we're supposed to be all done with that kind of work, so we're not sure what to do there. Hopefully we'll get the windshield soon. |
About Our Locost Please Note: Our database is currently unavailable so you will not be able to browse through log entries. This happens sometimes, and it usually doesn't last long. We're sorry for the incovenience. Please try again later. Or in a few minutes. | ||||
 Home
Home


