 |
|||||
|
views:
March 9, 2012
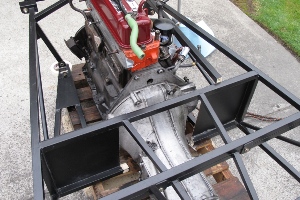
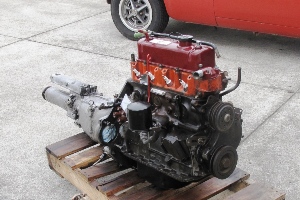
Fitting all of the parts from an M.G. into a Locost may be a little trickier than I thought. We cleaned up the engine and transmission, then did some more trial fitting with the mock-up frame and a hacksaw. Clearance for the bell housing is almost 3/4" now, and that's with 3-1/2" between the engine backplate and firewall. But the transmission is still huge, and the mount is big enough for a truck. We have to raise the transmission tunnel from 9" to 10" to fit the turret, and even with the mount chopped down to the nub it's going to intrude into the passenger footwell. We'll figure out something.
The mock-up frame is really taking a beating with all the work its been getting lately. Of course we've been chopping it up some, which hasn't helped, but it's also getting banged around a lot. Leaving it outdoors leaning against the side of the house for a couple of days probably didn't help either. Several glue "welds" have failed and a few other tubes are loose or gone altogether. But it's doing what it was built to do, serving its purpose, and hopefully it'll last long enough to see us through the rest of the build.
A few days ago we made a mock-up of an engine mount out of cardboard, using measurements we took from the donor. For some unknown reason it actually fit. Our only concern is that it's kind of tall, and tall things tend to want to fall over. In the M.G., the frame rail rises near the front of the engine so the mount only needs to be two inches high. In the Locost, the frame rail is on the bottom of the car. If we do the math the mount is plenty strong, but it makes us nervous. We might try adding a brace from the top of the mount to the FU tube.
Over the past couple of days we've been slowly dismantling the donor. We'd be moving a lot faster if we weren't spending so much time cleaning up pieces as they come off the car. Apparently I don't like putting crusty parts on the shelf. We cleaned and painted the radiator, wire-brushed the pedal box cover and primed it, and even spent 15 minutes wire-brushing the radiator cap. Crazy, I know, when you can buy a new cap for just a few bucks, but there's something about putting as much of the original car in the Locost as possible. Several things are starting to become clear now about building a car from scratch. The main one is that we're not actually building a car from scratch, but are in fact assembling a car from worn-out parts off another car. In that way it feels more like a restoration than a build. Some of the worn-out parts may have to be replaced with new bits, but many, like the radiator, can be refurbished, which nine times out of ten just means wire-brushing and painting. As it turns out, wire-brushing parts is fun and rewarding. Not only are you removing years of rust and crud, but you're also lightening the part. Sometimes the rust is only surface deep, but sometimes it bonds itself to the metal in new and creative ways, pitting the surface and turning it black. At high enough RPMs, even the toughest corrosion yields to the power of the wire brush, sometimes even adding a gauge or two, turning, for example, ordinary, everyday 18 gauge sheet metal into lightweight 19 gauge steel. That's high tech. You can't even buy 19 gauge steel. Okay, you probably could if you were NASA, but you'd pay an incredible price for it. As more and more pieces come off the donor, I think it's important to keep track of where they all are. Most of the parts that came off during the engine extraction got scattered around the garage. So with that in mind we reorganized the Locost workshop last week, throwing out a bunch of old Miata parts—not sure why we were hanging onto all those warped brake rotors and worn-out shocks—and cleared several shelves just for Locost parts. They may not all fit, but there's still a little room left in the house. |
About Our Locost Please Note: Our database is currently unavailable so you will not be able to browse through log entries. This happens sometimes, and it usually doesn't last long. We're sorry for the incovenience. Please try again later. Or in a few minutes. | ||||
 Home
Home


